Part 2: Creating Your First Jenkins Pipeline
Getting Started
Jenkins CI/CD Series
Goal
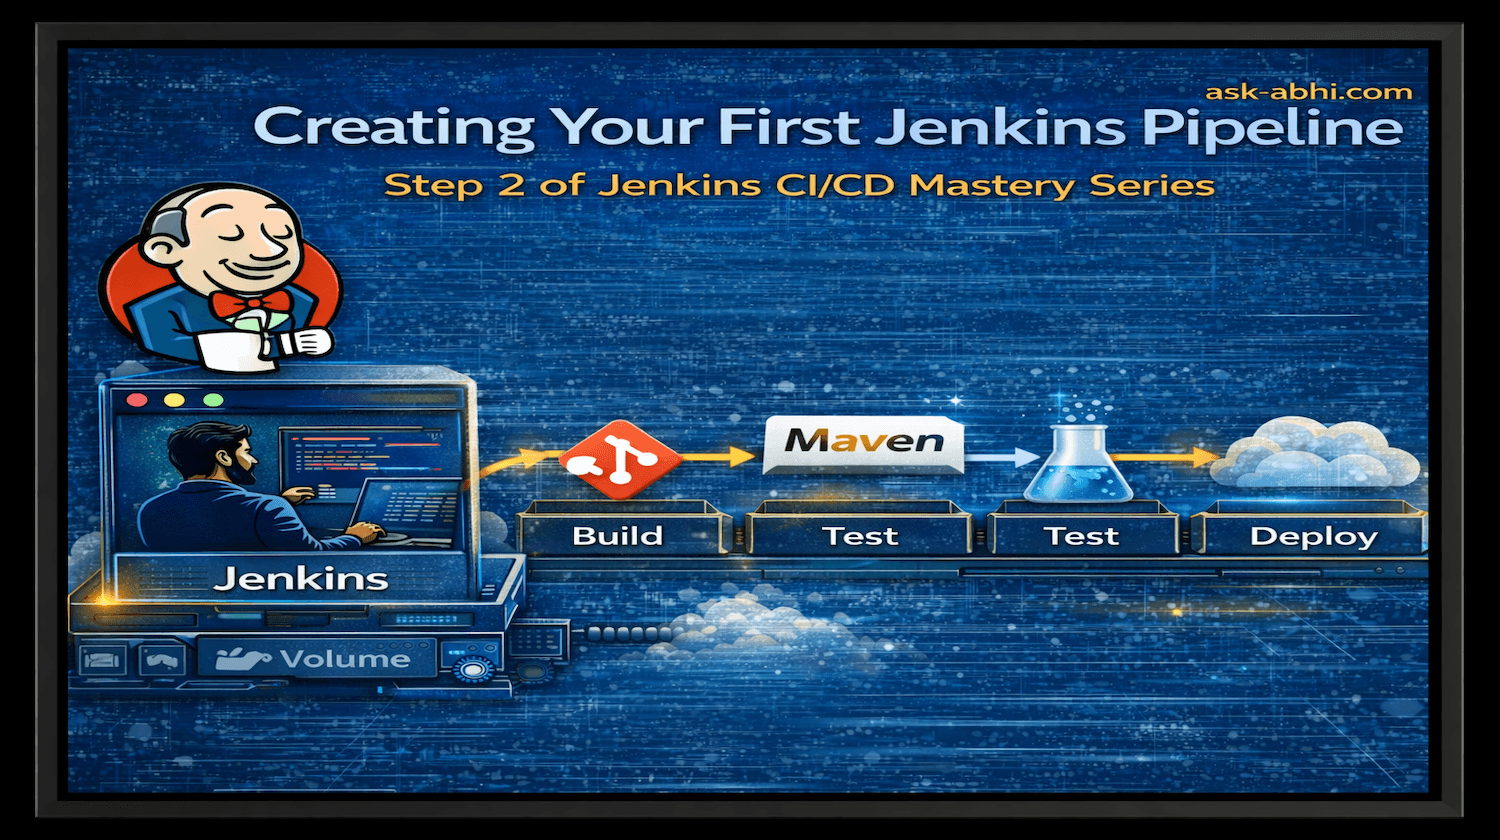
The goal of this project is to create and run the first Jenkins Pipeline that automates the process of building and testing an application.
In this exercise, we will configure Jenkins to pull application code from a Git repository, execute build commands using Maven, and run automated tests. This introduces the fundamental structure of a Jenkins Declarative Pipeline, including stages such as workspace cleanup, source code checkout, build execution, and testing.
By the end of this project, you will understand how Jenkins pipelines automate repetitive development tasks and form the foundation of modern CI/CD workflows.
Purpose
The purpose of this exercise is to demonstrate how Jenkins pipelines automate the software development lifecycle by defining a structured workflow for building and testing applications.
In traditional development environments, developers manually run build and test commands. Jenkins pipelines eliminate these manual steps by automatically executing them whenever a job is triggered.
Through this project, you will learn how to:
Define a Declarative Jenkins Pipeline
Organize automation tasks using pipeline stages
Integrate Jenkins with Git repositories
Execute build and test commands automatically
Understand how CI pipelines validate code changes
This hands-on exercise introduces the core concept of Continuous Integration, where code is automatically built and verified before moving further in the deployment pipeline.
Prerequisites
Before starting this project, ensure the following requirements are completed:
Ready to use
Hostand thedirectorystructure to runDockerfilesanddocker-compose.yml(Refer to Part 1)Demo-app repo: Fork the application repository used for the pipeline demonstration:
Step-by-step Implementation
/home/jenkins/jenkins_home/docker-compose.yml
docker-compose.yml
services:
  jenkins:
    container_name: jenkins
    image: jenkins/jenkins
    ports:
      - "8080:8080"
    volumes:
      - $PWD/jenkins_home:/var/jenkins_home
    networks:
      - net
networks:
  net:
Note- No need to use customized Dockerfile since this will download a jenkins image from Docker Hub which has enough packages required for this project
docker compose up -d
- Install Maven
# Login
docker exec -it -u root jenkins bash

# Install maven
apt-get install maven

Note- Since I have Maven already installed, it shows it exists
- Create Jenkins Job I names it
maven-pipeline

Create
Jenkinsfileseperatly and paste it into Pipleine script areaDemo application repo can be
forked
pipeline {
    agent any

    stages {

        stage('Clean Workspace') {
            steps {
                deleteDir()
            }
        }

        stage('Checkout Code') {
            steps {
                git url: 'https://github.com/abhinandan-chougule/demo-app-java-maven.git', branch: 'main'
            }
        }

        stage('Build with Maven') {
            steps {
                sh 'mvn clean install'
            }
        }

        stage('Run Tests') {
            steps {
                sh 'mvn test'
            }
        }
    }
}

- Click on
Build Now

- Console output Logs

Done!!!
Project 4: Jenkinsfile controlled through version control GitHub
- Goal:
Create Pipeline Job
Provide where to refer the Jenkinsfile
Run the Build
Note- We will make use of Jenkins is from above project
Fork repo
Jenkinsfile placed at below locaion in repo and will be used

- Create new Job
maven-github-pipeline

- Select options as below
Definition: Pipeline script from SCM
SCM: Git
Repository URL : Forked repo HTTP URL
Branch Specifier (blank for 'any'): */main
Script Path: jenkins/Jenkinsfile

Build now

- Go through Console output logs

- Build now one more time and go to Jobs Console output and compare

This is not cloning the repo again, instead it's checking if there are any latest commits and changes
Done!!!
Project: 5 Multibranch Pipeline
- Go to the repo and add another branch.

- Scan the Multibranch pipeline now, and it will populate the branches

- Let's make some changes to the repo and commit to the new branch."
devbranch"

- I am deleting the last stage


Done!!!
Project 6: Parameterize to give the option in the Jenkins Job to run on a specific AZ
Goal
Create a Jenkins pipeline named parameter-pipeline that accepts user inputs through parameters to control a deployment configuration. The pipeline should allow the user to specify a custom deployment name, choose the target AWS Availability Zone, and confirm the deployment before execution.
Purpose
The purpose of this Configuration is to demonstrate how parameterized Jenkins pipelines work. By defining parameters, the pipeline becomes more flexible and interactive, allowing users to provide deployment-specific inputs at runtime instead of hardcoding values in the pipeline.
This exercise introduces three commonly used Jenkins parameter types:
String Parameter – to provide a custom deployment name.
Choice Parameter – to select the AWS Availability Zone (EU-WEST-2A, EU-WEST-2B, EU-WEST-2C).
Boolean Parameter – to confirm whether the deployment should proceed.
Using parameterized pipelines is a common practice in DevOps CI/CD workflows, enabling controlled deployments across different environments or regions while minimizing manual changes to pipeline code.
Here is the code that will be used
pipeline {
    agent any

    parameters {
        string(
            name: "deploymentName",
            defaultValue: "",
            description: "Deployment Name?"
        )

        choice(
            name: "azDeploy",
            choices: ["ap-southeast-1a", "ap-southeast-1b", "ap-southeast-1c"],
            description: "What AZ?"
        )

        booleanParam(
            name: "confirmDeploy",
            defaultValue: false,
            description: "CONFIRM DEPLOYMENT?"
        )
    }

    stages {
        stage("Deploy") {
            steps {
                echo "Deployment Name: ${params.deploymentName}"
                echo "AZ Selected: ${params.azDeploy}"
                echo "Deployment Confirmation: ${params.confirmDeploy}"
            }
        }
    }
}
- Create Pipeline
parameter-pipeline"

- Add the script to the
pipeline script

Build Now

- Provide inputs and click
build with parameters

- Expected
console output

- Pipeline status

Done!!!
Project: How to virtualize the Jenkins jobs so it would be reusable
Goal
Create a Jenkins pipeline that demonstrates how to define and use environment variables within a Jenkins Declarative Pipeline. The pipeline initializes different types of variables (string, number, and boolean) and verifies that they can be accessed and printed during pipeline execution.
Purpose
The purpose of this task is to understand how environment variables work inside a Jenkins pipeline and how they can be referenced within stages and steps. By defining variables such as a string, a number, and a boolean inside the environment block, the pipeline provides a simple demonstration of how configuration values can be stored and reused across pipeline stages.
This approach helps standardize pipeline configurations and allows DevOps engineers to manage commonly used values in a centralized location within the pipeline. Environment variables are widely used in CI/CD workflows for tasks such as configuring application settings, defining build parameters, and passing values between different stages of a pipeline.
Through this exercise, users learn how Jenkins pipelines can manage and reference variables efficiently, which is a foundational concept when building more advanced automation and deployment pipelines.
- Prepare the code
pipeline {
    agent any

    environment {
        def myString = "Hello World"
        def myNumber = 10
        def myBool = true
    }

    stages{
        stage("Demo") {
            steps {
                echo "myString: ${myString}"
                echo "myNumber: ${myNumber}"
                echo "myBool: ${myBool}"
            }
        }
    }
}
- Create pipeline "variable-jenkins."

- Paste the code into the
pipeline script

Build Now
Now we can see the pipeline using the variables given in the environment block

Done!!!
Conclusion
In this part of the Jenkins CI/CD series, we created and executed our first Jenkins pipeline. The pipeline automated a basic CI workflow that includes cleaning the workspace, cloning source code from Git, building the application using Maven, and running automated tests.
This project introduced the fundamental structure of Jenkins pipelines and demonstrated how build and test processes can be automated through a simple pipeline script.
Understanding how to create and execute pipelines is a critical step toward building scalable CI/CD workflows. Jenkins pipelines allow teams to standardize build processes, reduce manual intervention, and ensure consistent application validation.
In the next part of the series, we will expand Jenkins automation capabilities by enabling it to execute commands on remote servers using SSH, which is a common requirement in deployment and infrastructure automation workflows.
🔗 Continue the Series
⬅️ Previous Article: Part 1 Install Jenkins with Docker
➡️ Next Article: Part 3 Jenkins SSH Remote Execution
⭐ If you found this article useful, follow https://ask-abhi.com for more DevOps tutorials.