Building a Kubernetes Cluster on a laptop using kubeadm, VirtualBox, and Vagrant
Can be follow for: Windows, Mac x86 (Intel) or Mac Silicon (M series)
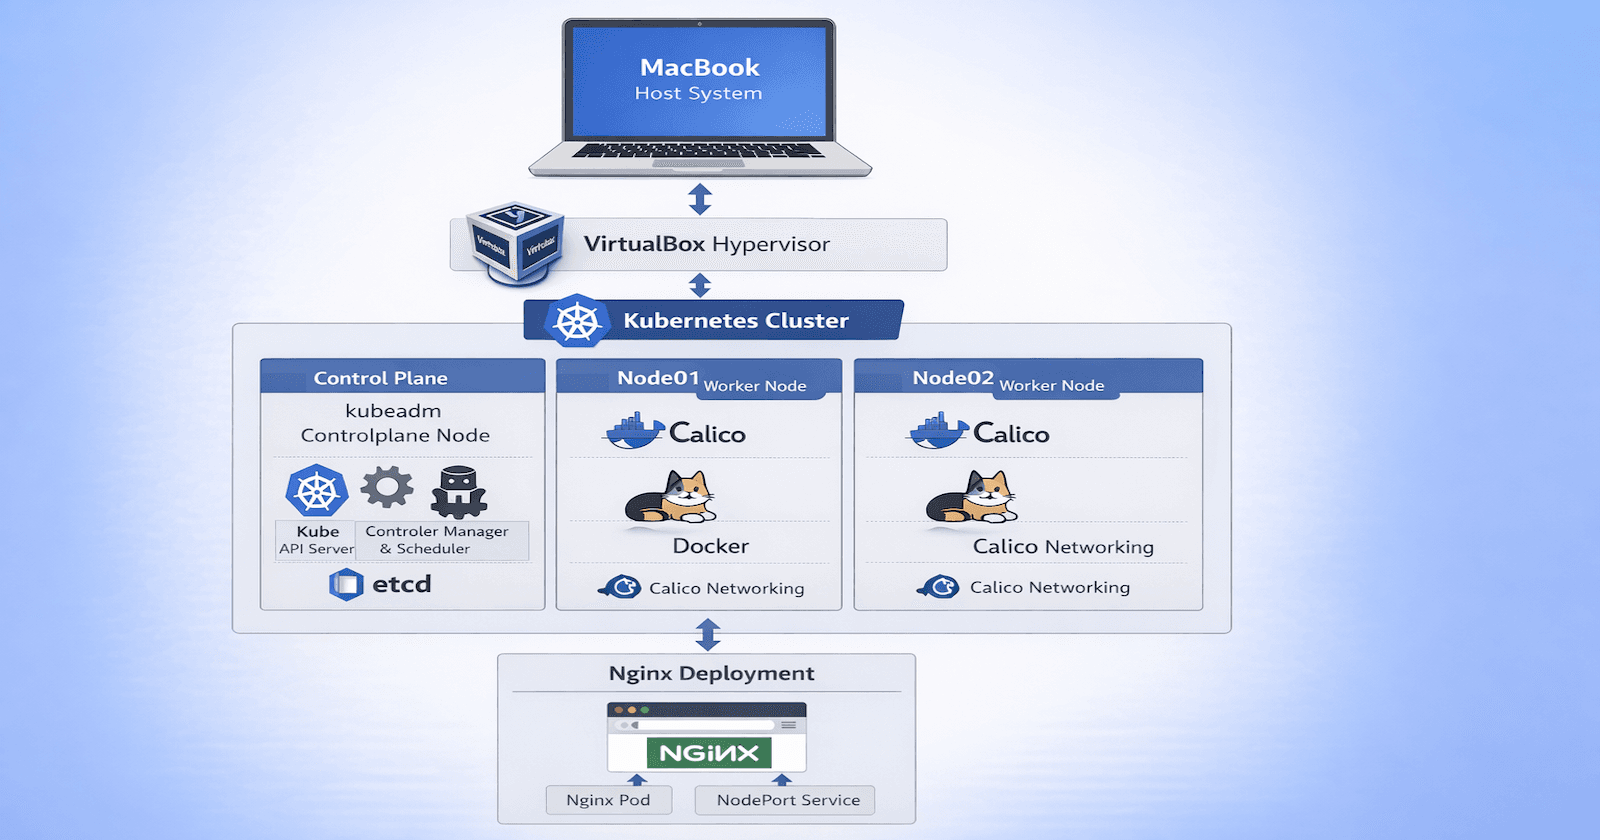
Running Kubernetes locally is one of the best ways to understand how clusters work internally. In this article, I’ll walk through how I built a multi-node Kubernetes cluster on my Mac using Vagrant and VirtualBox, bootstrapped it with kubeadm, installed networking with Calico, and finally deployed an Nginx application to verify everything works.
This setup is perfect for DevOps engineers, SREs, and Kubernetes learners who want a production-like environment on their laptop.
Tips -
Follow/Read this article first to get base idea and then deploy as per your requirement by using cka-practice-code repo for specfic commands
Lab Architecture
Mac (Host Machine)
        │
        ▼
VirtualBox Hypervisor
        │
        ▼
Vagrant Managed VMs
        │
        ├── controlplane
        ├── node01
        └── node02
Environment Setup
Tools used in the lab:
Oracle VM VirtualBox – VM hypervisor
Vagrant – Infrastructure automation
Kubernetes – Cluster platform
Project Calico – CNI networking plugin
VM Resources
| Node | CPU | RAM |
|---|---|---|
| controlplane | 2 | 2GB |
| node01 | 2 | 2GB |
| node02 | 2 | 2GB |
Configure laptop and build VMs
Install the following tools on Windows or macOS x86.
Download and install Oracle VM VirtualBox
https://www.virtualbox.org/wiki/Downloads


Go to the
AppclickVirtualBoxto complete the installation

Go to Terminal and Install Vagrant
brew tap hashicorp/tap
brew install hashicorp/tap/hashicorp-vagrant
- Verify Installation with
vagrant --version

Clone the cka-practice-code locally
Navigate to the cloned directory
cka-practice-code/kubeadm-clusters/virtualbox and type vagrant up to start creating virtual machines (Controlplane, node01 & node02) through a script

Note the IPs after completion, required for SSH

We can check the status in Oracle Virtual Manager as well

- Access VMs by SSH to install required tools/components
Use the commands below to play with the environment
Check Status
vagrant status
Stop all VMs:
vagrant halt
Destroy environment:
vagrant destroy
Show VM's Names
VBoxManage list vms | awk -F\" '{print $2}'
Install Multipass on Mac M series (Apple Silicon)
https://canonical.com/multipass/install

- Navigate to the Apple-Silicon directory and run the script
./deploy-virtual-machines.sh

- Destroyed by the script
./destroy-virtual-machines.sh
Primary setup: Run these commands on all three nodes Controlplane, node01 & node3
Tips - Kubernetes document for reference
Go to the repo 04-node-setup.md and start running commands one by one
Connect all three by SSH with the below credentials.
username: vagrant
password: vagrant

Note- Run all these commands on all three (Controlplane, node01, node2)
Boot the controlplane
Configure Controlplane by following 05-Controlplane.md commands
Note- Run this only on Controlplane
Refer CNI documents but required commands provided in repo itself
Remember to copy the kubeadm join command and follow the remaining steps until
- Verify Controlplane is Ready
kubectl get pods -n kube-system

Join the workers nodes to Controlplane by using step 06-workers.md
Hope you have the below ready-to-use command copied from Controlplane; otherwise, it can be retrieved by using kubeadm token create --print-join-command
kubeadm join 192.168.0.185:6443 --token 2lccuf.ha2rxb9dclxzkvrp \
        --discovery-token-ca-cert-hash sha256:26d681f9cd77e66a71bbe5e4cd903fae34458660ce2304ff7b73f168fcf9c4c2
Verify on Controlplane if nodes are joined as Workers

Test the cluster, follow 07-test.md
- Test worker node01

- Test worker node02

Since we have installed the cluster with bridge networking (the default), we can view NodePort services with your browser.
Run the following command on controlplane to get the browser address, then copy the output to your browser:
echo "http://\((dig +short node01):\)PORT_NUMBER"
Verify from the browser

Key Learnings
Building Kubernetes manually with kubeadm provides a deeper understanding of:
Control plane components
Node registration
Cluster networking
Kubernetes troubleshooting
Real production cluster architecture
Final Result
✔ Multi-node Kubernetes cluster running locally
✔ Networking configured with Calico
✔ Worker nodes successfully joined
✔ Nginx application deployed and accessible from the browser
This environment closely simulates a real production Kubernetes setup and is extremely useful for learning Kubernetes architecture and troubleshooting.
Thanks for your time and effort to get your hands dirty.
Happy Learning!
Abhinandan Chougule