Gateway API: Modern Kubernetes Traffic Routing replacing Ingress
Gateway API Project
Kubernetes networking has evolved significantly over the years. Traditional Ingress controllers solved many problems, but they were often limited in flexibility and extensibility.
The Gateway API introduces a more powerful and expressive model for managing traffic in Kubernetes clusters.
In this guide, we will build a modern traffic routing architecture using KGateway and the Gateway API on Kubernetes.
Advantages:
Better than traditional Ingress
Standard Kubernetes networking API
Flexible routing rules
Multi-cluster support
Advanced traffic management
We will cover:
Installing Gateway API CRDs
Deploying the KGateway controller
Creating a Gateway
Deploying an application
Routing traffic using HTTPRoute
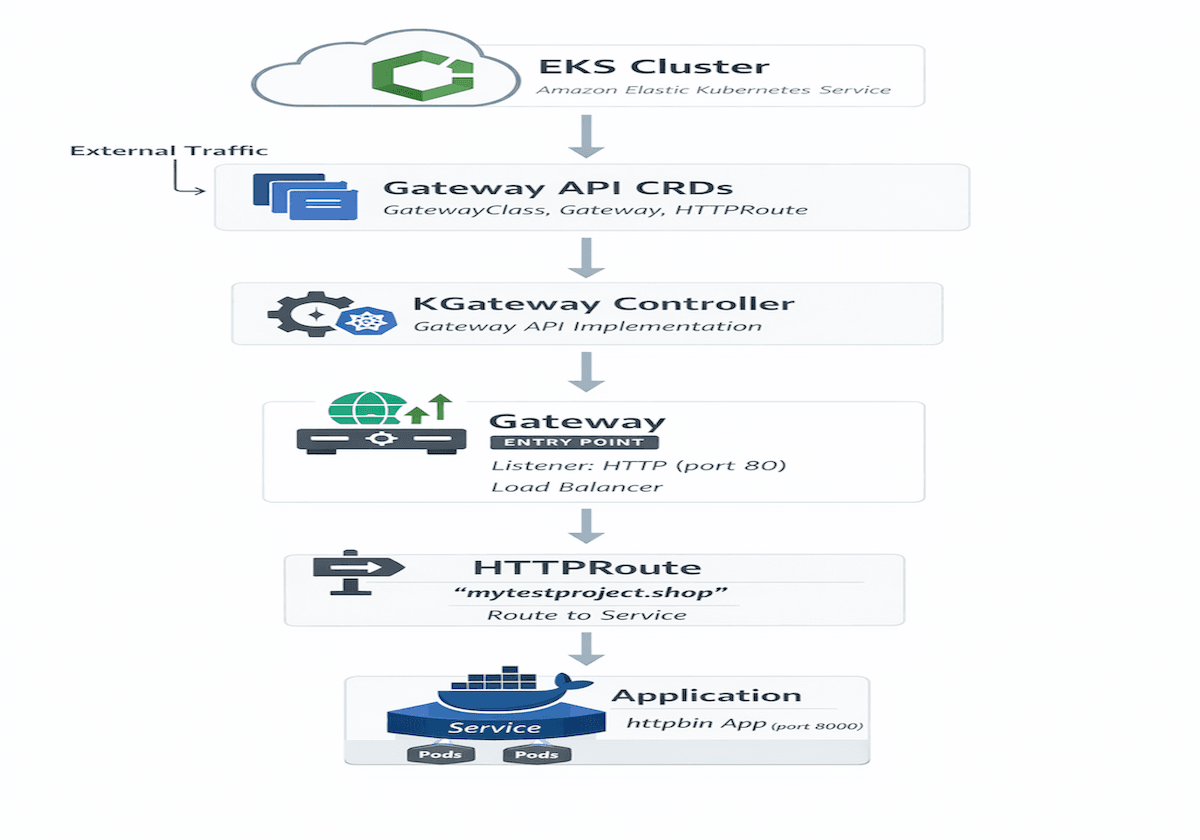
| Component | Purpose |
|---|---|
| Gateway API CRDs | Extend Kubernetes networking |
| KGateway Controller | Implements the Gateway API |
| Gateway | Entry point for external traffic |
| HTTPRoute | Defines traffic routing rules |
| Service | Internal load balancing |
| Pods | Running application |
Environment Setup
Create an EC2 Instance with t2-medium and 30gb gp3 disk, it will be used as a jump host to manage the cluster

sudo apt update
Connect to EC2 by SSH
Clone the repo
This will create all basic configurations for EKS

- Install AWS CLI
#!/bin/bash

curl "https://awscli.amazonaws.com/awscli-exe-linux-x86_64.zip" -o "awscliv2.zip"
sudo apt install unzip
unzip awscliv2.zip
sudo ./aws/install
aws configure
Create an Access key and secret key if its first time using the AWS console, and Enter into the console when it asks while installing AWS CLI


- Install Terraform
#!/bin/bash

#Update system package
sudo apt-get update

#Install GNU software properties and curl packages
sudo apt-get install -y gnupg software-properties-common -y

#Install the HashiCorp GPG key
wget -O- https://apt.releases.hashicorp.com/gpg | \
gpg --dearmor | \
sudo tee /usr/share/keyrings/hashicorp-archive-keyring.gpg > /dev/null

#Verify the key's fingerprint
gpg --no-default-keyring \
--keyring /usr/share/keyrings/hashicorp-archive-keyring.gpg \
--fingerprint

echo "deb [signed-by=/usr/share/keyrings/hashicorp-archive-keyring.gpg] \
https://apt.releases.hashicorp.com $(lsb_release -cs) main" | \
sudo tee /etc/apt/sources.list.d/hashicorp.list

sudo apt update
sudo apt-get install terraform -y

terraform --version

- Install Kubectl
#!/bin/bash

curl -o kubectl https://amazon-eks.s3.us-west-2.amazonaws.com/1.19.6/2021-01-05/bin/linux/amd64/kubectl
chmod +x ./kubectl
sudo mv ./kubectl /usr/local/bin
kubectl version --short --client

aws configureto connect with the AWS account

aws sts get-caller-identityto Verify Account

cdto the directory andTerraform init

terraform plan

- Apply the changes to deploy EKS
terraform apply --auto-approve

- Install helm
sudo apt update & sudo apt upgrade -y
curl -fsSL https://raw.githubusercontent.com/helm/helm/main/scripts/get-helm-3 | bash

- Verify if the cluster is accessible
aws eks --region ap-southeast-1 update-kubeconfig --name askabhi-cluster

kubectl get nodes

- Install CRD for kgateway by helm upgrade
Note: Prerequisites
Before you begin, ensure you have:
A Kubernetes cluster.
kubectlinstalled and configured to communicate with your cluster.
helminstalled, the package manager for Kubernetes.
Install the Kubernetes kgateway CRD and Gateway API CRDs (Custom Resource Definitions)
Kgateway is an implementation of the Kubernetes Gateway API, which requires specific CRDs to be present in your cluster. The official documentation recommends installing the CRDs separately from the main kgateway chart.
helm upgrade -i --create-namespace --namespace kgateway-system kgateway-crds oci://cr.kgateway.dev/kgateway-dev/charts/kgateway-crds --version v2.3.0-main
(Note: The --version tag may need to be updated to the latest release.)

Install the Kgateway Controller
Once the CRDs are in place, install the main kgateway controller.
helm upgrade -i --namespace kgateway-system kgateway oci://cr.kgateway.dev/kgateway-dev/charts/kgateway --version v2.3.0-main

Verify the Installation
After the installation is complete, verify that the kgateway pods are running in the kgateway-system namespace.
kubectl get pods -n kgateway-system
You should see pods with a Running status. You can also verify that the GatewayClass resource named kgateway has been created.
We need to decide which controller needs to be used

kubectl get gatewayclass kgateway

- Install the Gateway API CRDs
First, apply the standard CRDs from the official Kubernetes sigs GitHub repository to your cluster. The standard channel is recommended for most users as it includes stable (GA or beta) resources:
kubectl apply --server-side -f https://github.com/kubernetes-sigs/gateway-api/releases/download/v1.5.0/standard-install.yaml
To verify the installation, you can run:

Verify
kubectl get crds | grep gateway

Install the httpbin Application
The httpbin sample application for kgateway (formerly part of Gloo) can be deployed in Kubernetes using the following command to test routing rules:
kubectl apply -f https://raw.githubusercontent.com/kgateway-dev/kgateway/refs/heads/main/examples/httpbin.yaml
Purpose: This YAML deploys a httpbin service in a namespace (typically httpbin), which is used to verify that the Gateway proxy is correctly routing external traffic to backend services.

Verify what the namespaces we have are

Check the route for the gateway
kubectl get gateway
Traffic is going to which service
kubectl apply -f- <<EOF
apiVersion: gateway.networking.k8s.io/v1
kind: Gateway
metadata:
  name: kgateway-system
spec:
  gatewayClassName: kgateway
  listeners:
  - name: http
    protocol: HTTP
    port: 80
    # Optional: restricts which namespaces can attach routes to this listener
    allowedRoutes:
      namespaces:
        from: All # Other options: Same, Selector
EOF

Check gateway Created
kubectl get gateway

The address shown in the above snap is Cloud Load Balancer a243521ba1b904868a7d7b8707db3b7c-2045018130.ap-southeast-1.elb.amazonaws.com
- Copy this and go to GoDaddy and add a CNAME

- Go back to the server and do
nslookupfor the Cloud Load Balancer and get the IP.

Note- we should see the IP's like below else wait
- Add an
Arecord with the IP you see

Route the traffic to the Domain
kubectl apply -f- <<EOF
apiVersion: gateway.networking.k8s.io/v1
kind: HTTPRoute
metadata:
  name: httpbin
  namespace: httpbin
spec:
  parentRefs:
  - name: kgateway-system
    namespace: default
  hostnames:
  - "mytestproject.shop"
  rules:
  - backendRefs:
    - name: httpbin
      port: 8000
EOF

- What did we do? We pointed out the following
service/httpbinto route through the domain

- Now you can try to access the Domain

Conclusion:
Kubernetes networking continues to evolve, and the Gateway API represents the next step forward in traffic management.
By combining Gateway API and KGateway, we can build scalable and flexible networking architectures that are easier to manage than traditional ingress-based setups.
This architecture enables modern DevOps teams to implement advanced routing patterns while keeping Kubernetes networking standardized and maintainable.